How to Use “Wako TLC Viewer”
How to Use “Wako TLC Viewer”

Please download the application from the link or the QR code below.


Start app
Scan barcode screen
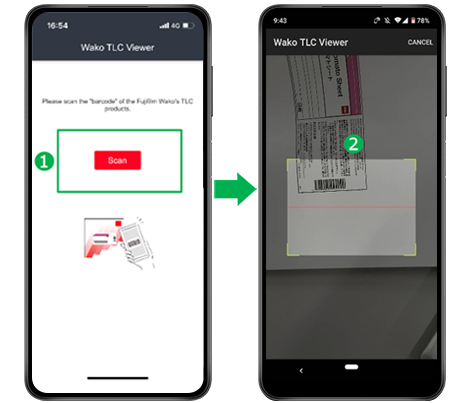
1 Tap Scan and 2 scan the barcode of Fujifilm Wako’s product.
- Barcodes other than Fujifilm Wako’s products (manufacturer: Fujifilm Wako Pure Chemical Corporation) cannot be used for scanned.
- Please allow access to the camera of your device in this application in advance.
Register a TLC
Home screen
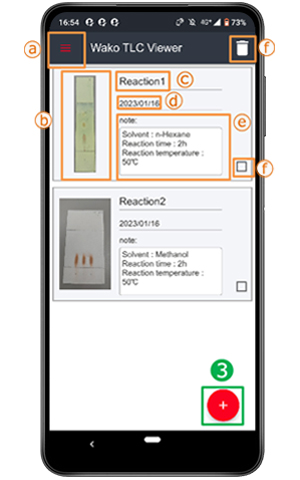
3 Tap + to start camera and shoot the TLC you want to measure the Rf value.
-
a.Menu:
There are links to How to Use (this page), Fujifilm Wako web site, Fujifilm Wako TLC products web site, and Terms of Use. -
b.Thumbnail image:
The last captured TLC image is displayed. -
c.Title:
Titles such as sample names and experiment themes can be entered (editable). -
d.Shooting date:
The date of the last shot is displayed (editable on the Gallery screen). -
e.Note:
Comments such as experimental conditions and developing solvents can be entered (editable). -
f.Delete TLC folder:
Delete the selected TLC folder (cannot be canceled).
TLC shooting screen
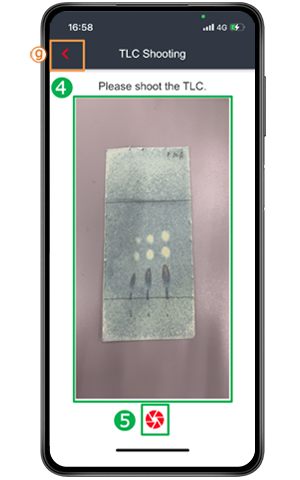
4 Focus on the TLC and 5 tap to shoot.
-
g.Move to Gallery screen:
Move to Gallery screen.
Measure the Rf value
Gallery screen
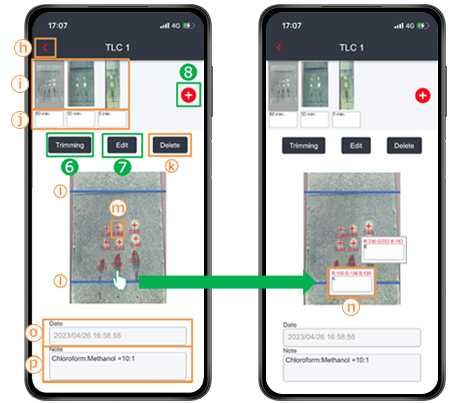
Tap each spot to display the spot's nchromaticity (RGB value*) and spot title (editable).
The Rf value of the shot TLC are displayed. 6 Tap Trimming to adjust the TLC crop position. 7 Tap Edit to adjust the detection position of the Rf value/RGB value. k Tap Delete to delete the displayed TLC. 8 Tap + to move to a new TLC shooting screen.
- RGB value: A method of expressing colors composed of the three primary colors of light: red (R), green (G), and blue (B).
-
h.Move to Home screen:
Move to Home screen -
i.Thumbnail image:
A list of TLC images shot in the same folder is displayed. You can edit the selected TLC. -
j.TLC title:
Titles such as sample name corresponding to each TLC can be entered (editable). -
k.Delete:
Delete the displayed TLC (cannot be canceled). -
l.Original line and Solvent front line:
It displays the Original line and Solvent front line of the shot TLC (7 editable with Edit). -
m.Rf value:
The Rf value of detected spots are displayed.
Tap + to display the chromaticity (RGB value) and the comment field (editable) for the spot (7 spot position can be edited with Edit).
-
n.RGB value, Spot title:
Displays the chromaticity (RGB value) and Spot title of the detected spots. In the Spot title, titles such as compound name corresponding to each spots can be entered (editable).
-
o.Date:
The date when the TLC was shot is displayed. -
p.Note:
Comments such as developing solvent can be entered (editable).
Trimming screen

6 Tap Trimming on the Gallery screen to move to the Trimming screen. Tap the mark of the white frame to move it. 9 And tap OK to cut the shot TLC image into any shape. Tap q to move to the Gallery screen.
- Once you tap OK, it cannot be canceled.
-
q.Move to Gallery screen:
Move to Gallery screen.
Edit screen
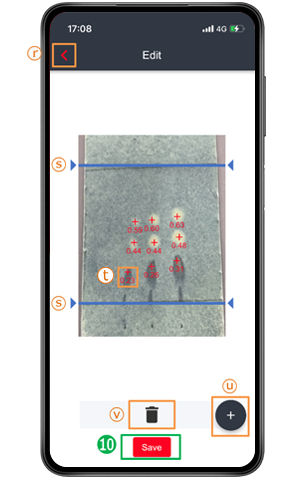
7 Tap Edit on the Gallery screen to move to the Edit screen. The following r to v can be edited on this screen. 10 Tap Save to complete the edited content. Tap r to move to the Gallery screen.
- Once you tap Save, the operation cannot be undone.
-
r.Move to Gallery screen:
Move to the folder where the shot TLC is saved. -
s.Original line and Solvent front line:
It displays the Original line and Solvent front line of the shot TLC. You can adjust the position by tapping and moving . -
t.Detected spot:
The Rf value is displayed. By tapping and moving the + , you can adjust the position of the detected spot. -
u.Adding detected spot:
Tap + to increase the number of detected spots. -
v.Deleting detected spot:
Tap t + and slide to v to delete the detected spot.
Output as PDF
Gallery screen
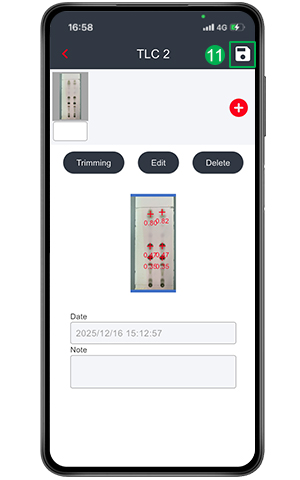
Tap the 11 “ ” icon on the Gallery screen to output a PDF.
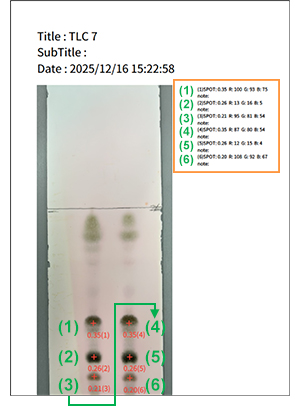
Spot information for Rf values/RGB values is displayed in the upper right corner ( ) in the order from the top left.
「Wako TLC Viewer」の使い方
アプリのダウンロードは下記リンクまたはQRコードからアクセスしてください。


アプリの起動
認証画面
1「Scan」をタップし、当社製品のバーコードを読み込み、2 認証します。
- 当社製品(製造元:富士フイルム和光純薬)以外のバーコードは認証に使用できません。
- 事前に本アプリにおけるカメラへのアクセスを許可してください。
- 認証はアプリを終了すると解除されます。
TLCを登録する
ホーム画面
3 「+」をタップし、Rf値を測定したいTLCを撮影します。
-
a.メニューバー:
使用方法(本ページ)、当社試薬HP、当社TLC HP、利用規約へのリンクを掲載しています。 -
b.TLC画像:
最後に撮影したTLCの画像が表示されます。 -
c.タイトル:
サンプル名や実験テーマ等のタイトルを入力できます。(編集可能) -
d.撮影日:
最後に撮影した日付が表示されます。 (Gallery画面で編集可能) -
e.Note:
実験条件や、展開溶媒等のコメントを入力できます。(編集可能) -
f.TLCフォルダ削除:
選択したTLCのフォルダを削除することができます。(取り消しは出来ません)
TLC撮影画面
4 TLCをカメラで映し、5「」をタップして撮影します。
-
g.Gallery画面へ移動:
Gallery画面へ移動します。
Rf値を測定する
Gallery画面
各スポットをタップするとスポットのn色度(RGB値※)とタイトル(編集可能)が表示されます。
撮影したTLCのRf値を表示します。6「Trimming」をタップするとTLCの切り取り位置を調整できます。7「Edit」をタップするとRf値/RGB値の検出位置を調整できます。k「Delete」をタップすると表示されているTLCが削除されます。8「+」をタップすると新規TLCの撮影画面に移動します。
- RGB値:赤(R)、緑(G)、青(B)の光の三原色から構成される色の表現方法
-
h.ホーム画面へ移動:
ホーム画面へ移動します。 -
i.TLC画像:
同一フォルダ内で撮影したTLCの画像が一覧で表示されます。タップしたTLCを編集できます。 -
j.TLCタイトル:
サンプル名等、各TLCに対応するタイトルを入力できます。(編集可能) -
k.Delete:
表示されているTLCを削除します。(取消はできません) -
l.原線、溶媒フロント:
撮影したTLCの原線および溶媒フロントを表示します。( 7「Edit」で編集可能) -
m.Rf値:
検出したスポットのRf値を表示します。「 + 」をタップすると色度(RGB値)およびスポットタイトル(編集可能)が表示されます。(スポット位置は7「Edit」で編集可能) -
n.RGB値、スポットタイトル:
検出したスポットの色度(RGB値)、スポットタイトルを表示します。スポットタイトルでは化合物名等を入力できます。(編集可能) -
o.Date:
TLCを撮影した日付が表示されます。(編集可能) -
p.Note:
展開溶媒等の情報を入力できます。(編集可能)
Trimming画面
Gallery画面で 6「Trimming」をタップするとTrimming画面に移動します。白枠の印をタップして動かし、9「OK」をタップすると撮影したTLC画像を任意の形に切り取ります。q をタップするとGallery画面に移動します。
- 一度「OK」をタップした操作は取り消すことが出来ません。
-
q.Gallery画面へ移動:
Gallery画面へ移動します。
Edit画面
Gallery画面で 7「Edit」をタップするとEdit画面に移動します。本画面では下記の編集ができます。10「Save」をタップすると編集した内容が確定されます。r をタップすると、Gallery画面に移動します。
- 一度「Save」をタップした操作は取り消すことが出来ません。
-
r.Gallery画面へ移動:
Gallery画面へ移動します。 -
s.原線、溶媒フロント:
撮影したTLCの原線および溶媒フロントを表示します。 をタップして動かすと、位置を調節することができます。 -
t.検出スポット:
検出したスポットのRf値を表示します。「 + 」をタップして動かすと、スポットの検出位置を調整することができます。 -
u.検出スポットの追加:
「+」をタップすると検出するスポットを増やすことができます。 -
v.検出スポットの削除:
t「 + 」をタップし、v「」までスライドさせると、検出したスポットを削除することができます。
PDFを出力する
Gallery screen
Gallery画面で11「」をタップするとPDFを出力することができます。
左上のスポットから順番にRf値/RGB値のスポット情報が右上()に記載されます。